Thursday 20 December 2012

Bits and Pieces


I can finally say that I feel ready for Christmas.  Last week was very busy and I didn't get much sewing done at all.  By the time thursday arrived I was itching to stitch!
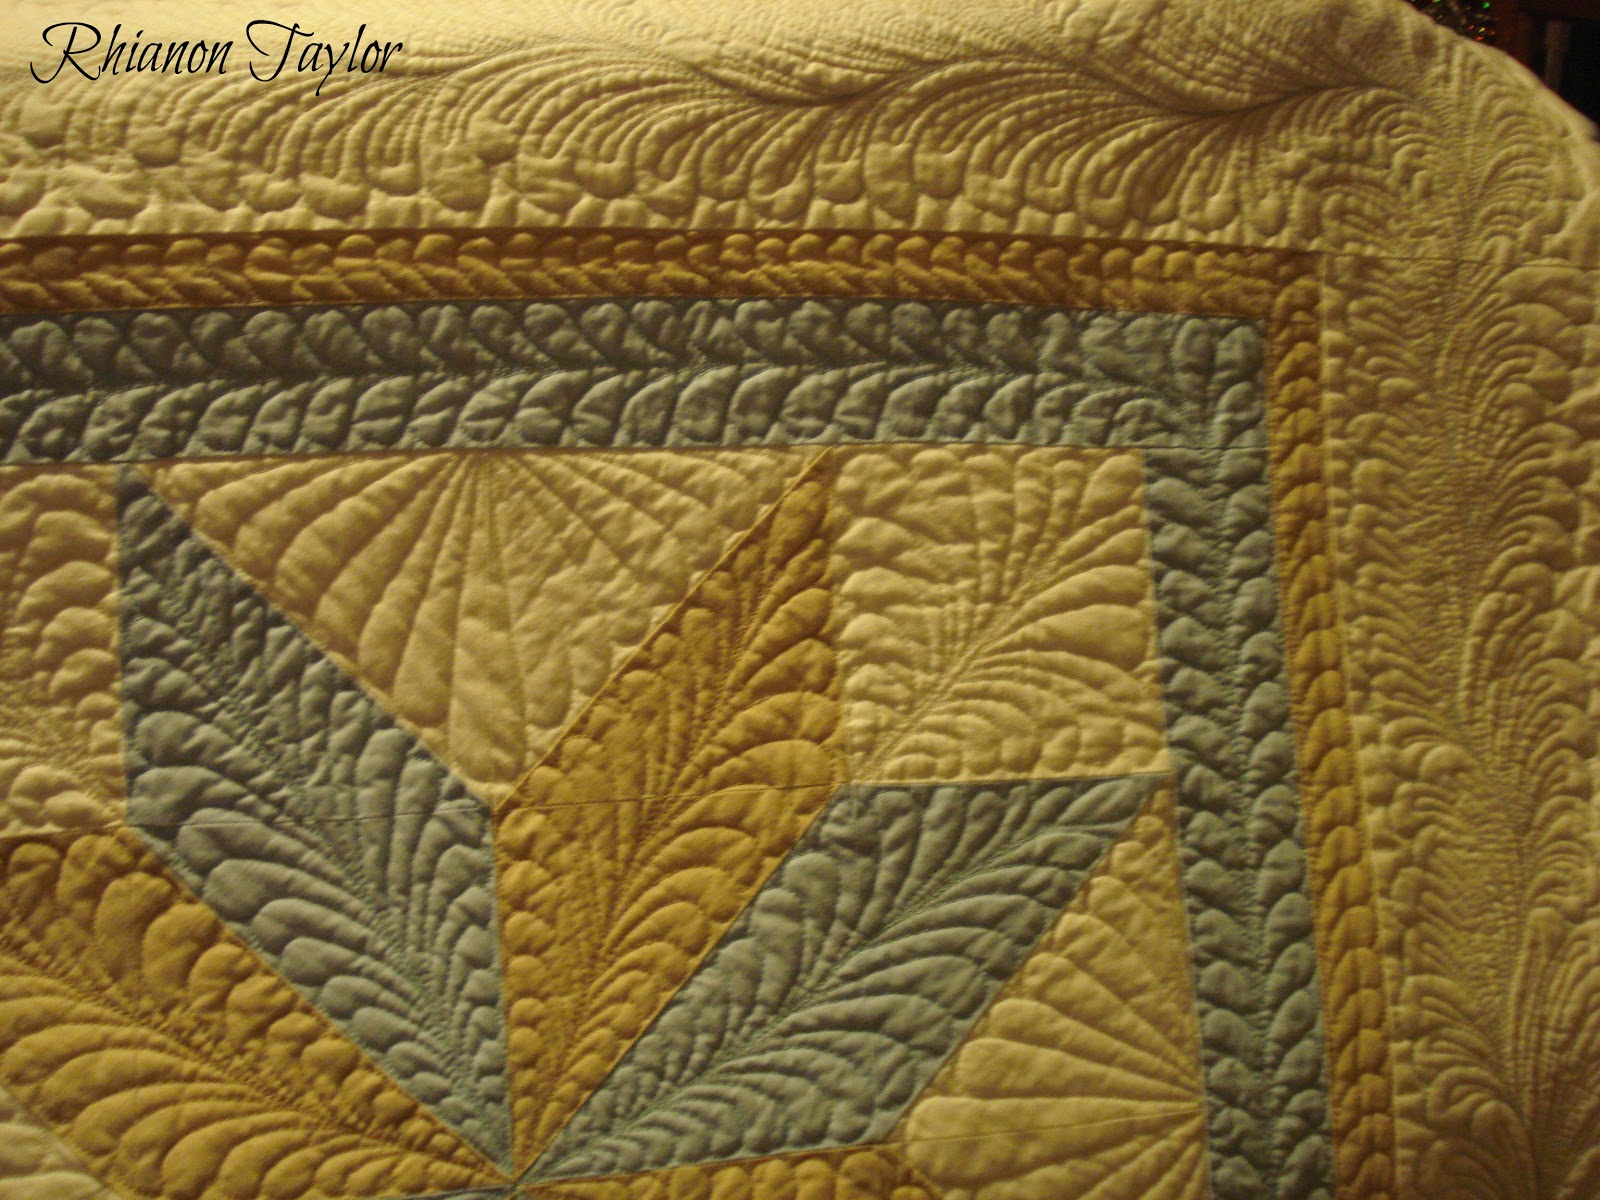
After watching a video by a Russian lady by the name of Natasha, I was inspiried to try some continuous line feather filler...and here it is...


I used a piece of duckegg blue satin and Hobbs Heirloom 80/20 wadding.  I took all these photos at night in different rooms, trying to get a good light.


I'm really pleased with how it turned out and can't wait to use it on a quilt.

If you'd like to see more of Natasha's work, you can find her blog here.
It's in Russian but just hit Google Translate and enjoy.

Natasha is one of my favourite quilters, a very talented lady who does all her quilting on a domestic machine.
Well worth a visit.


Over the weekend I got some small projects done. 


First up is this cute dolls quilt set.  I made it for the grandaughter of the caretaker who looks after the building our quilt group meets in.  A little birdie told me Santa is bringing her a new pram so I couldn't resist. It small, measures 12" x 15" and I had fun making it.


Next up I've been making some coasters, 3 sets of 4. Will come in handy for Christmas!


Also I forgot to show you what we made at quilt group last time -  ring pin cushions

I made a bigger one to go on my wrist.


I actually bought a plastic one because I needed it and it was totally useless, These ones are much better - they are made with elastic and  I've been using it alot especially when piecing.

So that is what I have been up to lately. 
I don't know if I will post again before Christmas,-  depends if I get any sewing done - so I'll take this opportunity to wish you all a very Happy Christmas.  Take care and have fun!
Rhianon.

Saturday 15 December 2012

Big Star Feather Frenzy


Yay!!  I finished the big star lap quilt I've been working on.  It's for a lady who loves feathers and she chose the colours.....


I love how it turned out - the colours remind me of Wedgewood china.

It measures 52" square and I used Hobbs Heirloom 80/20 wadding.


These were the borders being worked.
This was the only marking on the quilt - the spine of these feathers.  Everything else is completely freehand ( on my trusty little domestic)


Close up of feathers


This is the back of the quilt.


I like the angle of this photograph.


These are a few shots taken under atrificial light.


So that is what I was up to this week.  Now the mad rush for Christmas begins followed hopefully by a period of calm and lots of sewing.
Enjoy your weekend.
Rhianon.

Wednesday 12 December 2012

Ebook Review - Build Your Best Log Cabin


To my delight I was contacted by the nice people at Fons & Porter and asked if I would like to do a book review.
I thought, why not ?- I've been a quilter for many years now,bought plenty books in that time so I know a good quilt book when I see one.  Too often there are many mediocre books out there on the market but this is definitely not the case with this one!  ... and it is FREE !!!!

It is called Build Your Best Log Cabin and it is a little gem of a book.
It features the log cabin block in 3 different styles : Traditional, courthouse steps and chevron.


Each style has it's own little section beginning with an interesting potted history about that block  followed by a selection of layouts the block can be used in and also a pattern from some well known figures in the quilting world.
Contributors include Ricky Tims, Shon McMain, Lori Christianson and Marti Mitchell.


Each quilt you can make is beautifully photographed and the intructions are clear and precise.
There is something for every skill level here from easy to something more challenging.
Also included are charts which provide you with  different sized options for you to make your own quilts.
The possibilities are endless.


There are juicy little titbits thrown in too, in the form of hints and tips.
Ricky Tims shows you how he does trapunto quilting,

Liz Porter shows you how to join your binding without lumps and there is even a section showing you how to add piping to your binding.

This an ebook definitely worth saving in your files - it has certainly inspired me to go and dig into my string bins and I can't recommend it highly enough.

To download your FREE copy, click here and enjoy!!

As ever, thanks for stopping by. 
Rhianon.


Saturday 8 December 2012

Big Star Quilted Cushions


This week I got these cushions finished.....


They started as a test block for a lap quilt I am making.  I liked the block so much I decided to make another and turn them into a pair of cushions. 


I quilted feathers all over, although they do not show up too well on the darker patterned fabric.


I saw this block being demonstrated by Jenny from the Missouri Star Quilt Company.  You can find the tutorial here.    Jenny uses 10" squares with her block finishing at 25".   I did a slightly smaller version, using 8" squares to give me a finished block of 17".


I have used this block for a lap quilt I'm making....  here's a wee sneaky peek

I am having a lot of fun with these feathers - just the borders to finish quilting then it will be ready for binding.
So hopefully I will be back very soon with another finish.
See you then.
Rhianon.

Saturday 1 December 2012

Quilted Shop Sign and some Bunting.


I had a request this week from my eldest daughter Natalya  ( she's nearly 15) to make a sign for her.
I should explain that she has her own business making clay charms and jewellery.  You can see her work here  and she would be beyond thrilled if you went and liked her Facebook page.

She wanted the sign to hang off her table when she does the local craft fairs.  This is what I came up with :


I used bondaweb to make the lettering for her name then free motion quilted the other lettering and the flowers.

As it is not intended to be washed, I used Carron D'ache pencils to colour the flowers and I should mention that I only had a couple of days to make this.  It is needed for today!

To give it some sparkle, I aded a sequin and a bead to the center of each flower.


This is the bunting I made, although I did this last week.  I've never made bunting before but it was easy and fun. 


I'm going with Natalya this morning to help her set up - she is very pleased with her new sign and bunting and I enjoyed making it for her! 
Probably won't get much time for sewing this weekend as we are putting up the Christmas tree but I am working on a commissioned lap quilt which I'll show you all next time.  My aim is to get it finished for the end of the week.  Oh and at quilt group on monday, we are making ring pin cushions - can't wait!
Enjoy your weekend.
Rhianon.

Related Posts Plugin for WordPress, Blogger...