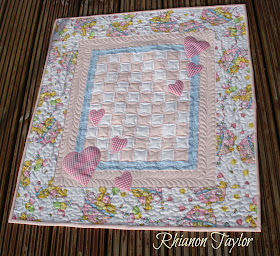
This cute little baby quilt was made as a pram or stroller blanket but can be adjusted to whatever size you wish by adding more four patch blocks in the center and wider borders.
This quilt measures 26" x 28".
To make it you will need:
1/2 metre of feature nursery fabric
1/2 metre of pale pink
fat quarter of white
fat quarter pale blue
Scraps in matching fabric for the hearts
small amount of fusible ( bondaweb ) for the applique
piece of backing fabric measuring approx 30" x 34"
piece of wadding ( batting) measuring the same as the backing.
Cut 2" strips from the white and the pink.
Sew one pink strip and one white strip together and cut into 2" segments. I press these seams open.
Make 20 four patch units and sew them together in a 5 x 4 formation.
Next cut 4 x 1 1/2 " strips from the pale blue fabric.
You could measure your center section to get the exact length of strips you need but for something this small I add the strips and cut off the excess.
Of course I would never do it this way on a large quilt but for something this small. its ok.
Cut 4 x 2 1/2 " strips from the pale pink fabric and sew these borders on. Press towards the pink.
For the next round cut 4 x 4 1/2" strips from the feature fabric and sew these on.
Finally using bondaweb, or any other method of applique. add a few scattered hearts of different sizes in a pleasing arrangement on the quilt top. I machine appliqued my hearts on using a close together zig zag stitch.
Now you can make up your quilt sandwich and quilt as desired.
I used Hobbs Heirloom 80/20 wadding.
Make sure you outline your hearts to make them stand out.
Use the remainder of the pale pink fabric to make binding and finish your quilt.
Enjoy!


Thank you so much Rhianon. You are a star
ReplyDeleteThank you so much Rhianon. You are a star
ReplyDeleteBeautiful! I love the quilting around the squares! Thanks for the tutorial !
ReplyDeleteThanks for this lovely pattern. It will be perfect for our first grandchild!
ReplyDeleteThanks for this lovely pattern. It will be perfect for our first grandchild!
ReplyDeleteThanks for this lovely pattern. It will be perfect for our first grandchild!
ReplyDelete