Quilting Projects

Monday, 21 April 2014

Angela's Sampler Quilt


My friend Angela ( we belong to the same quilt group - Glenrothes Quilters) made this beautiful sampler quilt.  It is from the Lynne Edwards book, The Essential Sampler Quilt.

Angela did a fantastic job making all the blocks, adding sashings etc and had got as far as basting and stitching in the ditch around each block then she got stuck and didn't quite know what to do with it.

After we got talking one day about vintage sewing machines, she offered me not one but three vintage machines including a Singer treadle and a Jones hand crank that is GREEN and an electric Singer with beautiful decals.  In return I offered to do some quilting on her sampler quilt and so the deal was struck!


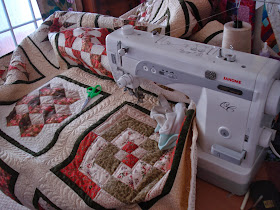
I quilted it on my Janome 1600p on the table top.  This quilt is so big it would not have fitted onto my Gracie frame anyway.  To me most of hard work was already done, i.e. basting and ditching, all I had to do was fill in the blanks.


Have to say, I really enjoyed quilting this.  Here are some of my favourite blocks:


For the borders, I quilted a continuous feather.


I didn't take many photos of the back - but here's one :


I gave the quilt back to Angela today and she loved it!! I am so pleased.  It really was quite nerve wracking working on somebody else's labour of love. I watched Angela make this quilt and I know the effort and care she put into it.   She is going to bind it in either the dark green or the same fabric as the border.  I think either will look great.  I will try and get a photo when the binding is done and I will tell you all about the vintage machines in another post.
I'll leave you of one last photo of this beautiful quilt and say Thank you Angela for letting me loose with my sewing machine.  I had a blast!


Til next time
Happy Stitchin'
Rhianon.

Friday, 18 April 2014

Sapphire Stars Quilt - Part 2, The Quilting.


Almost a year ago I pieced this quilt : Sapphire Stars.


You can see the original post here.  I also did a tutorial for the Wonky Star block. Click here to see it.
Anyway, back to the quilt.  I decided it was time for this to be quilted.  So with my Janome (1600p) back on the frame - I loaded this up.


 Started with some feathers in the outer border.........


                                              Very happy with how these turned out.


                                                            Next, onto the flying geese.

                         My workroom faces east so gets all the early morning sunshine - love it!


This is my 5th quilt on the frame.
Here are my frame worked quilts so far....

                                                                              No 1
                                                                           No 2
                                                                             No 3
                                                                             No 4
Looking forward to adding No 5 to the list !

Hope you all have a great Easter weekend.
Happy Stitchin'
Rhianon

Tuesday, 1 April 2014

Cathedral Window Cushion Tutorial


Cathedral window patchwork cushion - this is a hand sewing project.

This cushion finishes at 18" square.
You need 25 x 8" squares for the background.. 1.25 metres should be enough.
1 metre of fabric for the ruffle and cushion back
A cushion pad.


Start by folding over a 1/4" on all sides and press.


Fold in half and press, then fold the opposite way and press.  We want crease lines here.

Fold each corner into the center and press. Aim for nice sharp points on each corner.


Next, flip the square over and fold each corner into the center again.

It should look like this now.

Keep going until you have a stack of 25.   If you wanted to make a smaller cushion, 16 squares will give you a 14" cushion.

Using your thread doubled, secure the points with some small stitches.

The square on the left is the front and the square and on the right is the back.


Now take 2 squares with right sides together and over sew together.  Use your thread doubled for extra strength.   Don't worry too much about your stitching here as this won't bee seen.


Sew all your squares together in this way.
Now its time to add the windows.
You will need a selection of 2" squares.

                                                            I've used colourful  batiks.


Pin, opposite sides and work a running stitch, neatly, very neatly if you are using a contrasting thread!


                                       Just keep going until you have filled all the boxes.


Now for the frill.  You need double the length of each side.  Cut 5" strips, join together, fold over and press.  Its just like making binding.  If you wanted a smaller ruffle, simply cut your strips narrower.
Sewing it on is similar to adding binding except a small pleat is added every inch or so.
I did a previous tutorial, which you can find here  Don.t forget to fold over your ends at the start and finish of adding your ruffle.  This will be hand stitched together at the end.


Pause with the needle in the down position ( if your machine has that function, otherwise do it manually),of the previous pleat, and make the next pleat.  Continue all the way around.  At the corners, make a pleat as close to the corner as you can, turn the corner and immediately make another pleat.


Before the backing is added, pin the ruffle at the corner neatly so as not to catch it when stitching down the backing.
For the backing cut two rectangles the width of the cushion and about 12" long.  Fold and hem the width of cushion edge on one side of each piece.  With right sides together, pin the top piece first and stitch, then add the second piece.  Turn right side out and add a cushion pad.


A quilt made using this method would not need wadding or backing.  Something I've yet to do...........

I hope you've enjoyed this tutorial, if you have any questions then please get in touch.

Rhianon.